Deutsch
Your website just went down again, or maybe it’s loading so slowly that visitors are hitting the back button before your homepage even renders. Every second of delay costs you conversions, and every attack costs you revenue.
Here’s what most site owners don’t realize: your hosting server, no matter how powerful, is just one machine in one location. When someone in Singapore tries to access your site hosted in New York, they’re waiting for data to travel 9,000 miles. When a bot swarm hits your server, you’re paying for bandwidth to serve malicious traffic. And when an attack comes, you’re scrambling to stay online instead of running your business.
Cloudflare changes everything. In the next 15 minutes, you’ll learn how to deploy a global network of more than 300 data centers between your visitors and your server, caching content at the edge, blocking threats automatically, and cutting your load times by up to 50%. You’ll get free SSL certificates, DDoS protection that absorbs attacks before they reach your infrastructure, and bandwidth savings of 60 to 80 percent. No migration required, no downtime, no complexity – just faster, safer, and more cost-effective hosting.
What is Cloudflare and Why Use It?
Cloudflare is a content delivery network (CDN) and security service that sits between your website visitors and your hosting server. It acts as a protective layer that optimizes how data travels between your server and your visitors.
When someone visits your site, their request goes through Cloudflare first. Cloudflare serves cached content from its nearest data center (out of 300+ locations worldwide), blocks malicious traffic, and only forwards legitimate requests to your server. This process happens in milliseconds and is completely transparent to your visitors.
The service works with any hosting setup – shared hosting, VPS, dedicated servers, or cloud platforms. You don’t need to change your hosting provider or migrate your website. Simply point your domain’s nameservers to Cloudflare, and the service activates.
Benefits of Cloudflare
- Faster Loading Speeds
Cloudflare caches your static content (images, CSS, JavaScript, fonts) across its global network. Visitors download files from the nearest data center instead of your origin server, reducing latency by up to 50% for international audiences.
- Free SSL Certificates
Get automatic SSL/TLS encryption for your entire site at no cost. Cloudflare handles certificate generation, renewal, and management, ensuring secure HTTPS connections for all visitors.
- DDoS Protection
Built-in protection against distributed denial-of-service attacks on all plans, including free. Cloudflare’s network absorbs malicious traffic before it reaches your server, keeping your site online during attacks.
- Reduced Hosting Costs
By serving cached content and blocking bot traffic, Cloudflare reduces bandwidth usage on your origin server by 60-80%. This lowers hosting costs and extends your server capacity.
- Analytics Dashboard
Monitor real-time traffic patterns, security threats, cache performance, and visitor geography. Cloudflare’s analytics complement tools like Google Analytics by showing infrastructure-level insights.
- Bot Management
Automatic filtering of malicious bots, scrapers, and spam traffic. Only legitimate visitors and approved bots (like search engine crawlers) reach your server.
These benefits make Cloudflare a valuable addition to your hosting setup, no matter your website’s size or purpose. Whether you’re running a small blog on a Virtarix VPS , hosting a growing app on a VDS , or managing a large e-commerce store on a Dedicated Server , Cloudflare and Virtarix together can deliver faster performance, stronger security, and greater reliability.
Prerequisites
Before you begin, make sure you have:
-
- Your domain name (e.g., example.com)
- Domain registrar login credentials (where you purchased your domain)
- Your website is already hosted and live
Step 1: Create Your Cloudflare Account
Go to cloudflare.com and click “Sign Up” in the top right corner. Enter your email and create a strong password.
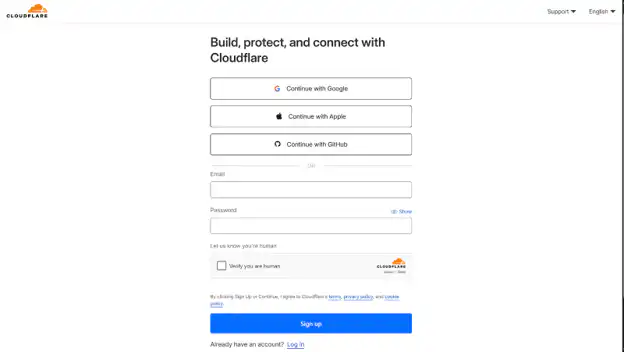
Cloudflare sends a verification email. Click the link to confirm your account. This takes you to your dashboard where you’ll add your first website.
The dashboard is your control center. You’ll return here to manage DNS, security settings, and view analytics for all domains you add to Cloudflare.
Step 2: Add Your Domain to Cloudflare
Click “Add a Site” on your dashboard. Type your domain exactly as it appears (example.com, not www.example.com).
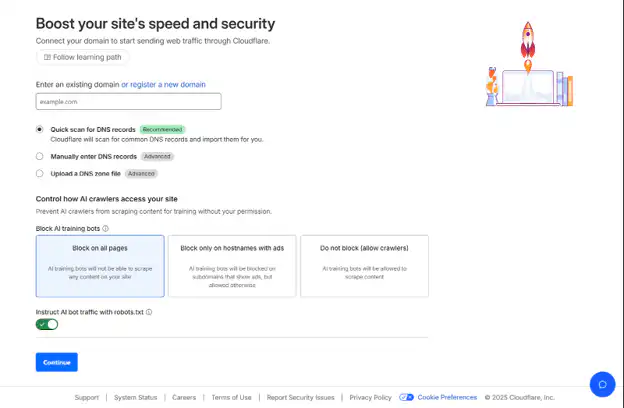
Cloudflare scans your existing DNS records. This takes 60-90 seconds. The system imports records from your current DNS provider automatically.
Cloudflare presents four plan options:
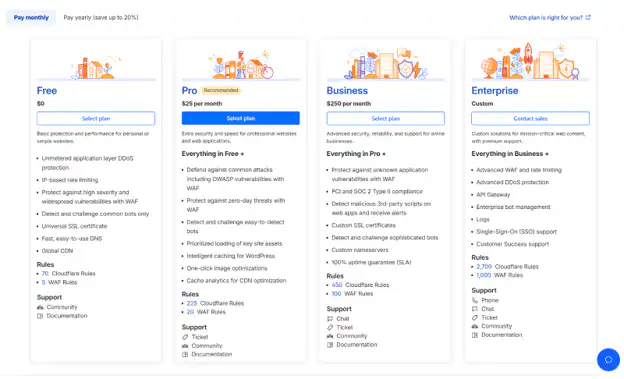
Choose Free to start. You can upgrade at any time without interruption to your service.
Step 3: Review and Verify DNS Records
Cloudflare displays all DNS records it found. Check each record carefully before continuing.
- A records : Point your domain to your server’s IPv4 address
- AAAA records : IPv6 equivalent of A records
- CNAME records : Create aliases (like www pointing to your root domain)
- MX records : Route email for your domain
- TXT records : Verify domain ownership for third-party services
The orange cloud icon next to each record means traffic routes through Cloudflare’s proxy (with caching and protection). Gray cloud means DNS-only without proxying.
How to Add Missing Records
Click “Add record” if Cloudflare missed anything. Select the record type from the dropdown menu.

Select the record type from the dropdown, enter the name (subdomain or @ for root), and add the corresponding value (IP address for A records, target domain for CNAME).
For web traffic (A and CNAME records), keep the orange cloud enabled. Click Save to add the record.
Email Records Configuration
Critical : Set all email-related records (MX, TXT for SPF/DKIM) to gray cloud. Proxying email through Cloudflare breaks delivery.
Your MX records must point directly to your mail server with correct priority values. If you use Google Workspace, Microsoft 365, or another email service, verify all their required DNS records appear exactly as documented.
Step 4: Update Your Nameservers
Cloudflare provides two custom nameservers that look like:
- alice.ns.cloudflare.com
- bob.ns.cloudflare.com
Log into your domain registrar account (Namecheap, GoDaddy, Google Domains, etc.). Navigate to your domain’s DNS or nameserver management section. Remove your current nameservers completely and add both Cloudflare nameservers exactly as shown.
Save your changes. Most registrars require explicit confirmation.
DNS Propagation Time
Nameserver changes propagate globally within 2-24 hours, typically completing in 2-6 hours. Cloudflare checks your nameservers automatically and sends an email when activation is complete. Your dashboard status changes from “Pending” to “Active.”
Your website remains accessible during propagation. Some visitors may reach your old DNS while others use Cloudflare, but both work simultaneously until propagation completes.
Whitelist Cloudflare IPs (Recommended)
Configure your server firewall to only accept traffic from Cloudflare’s IP ranges. This prevents attackers from bypassing Cloudflare and accessing your server directly.
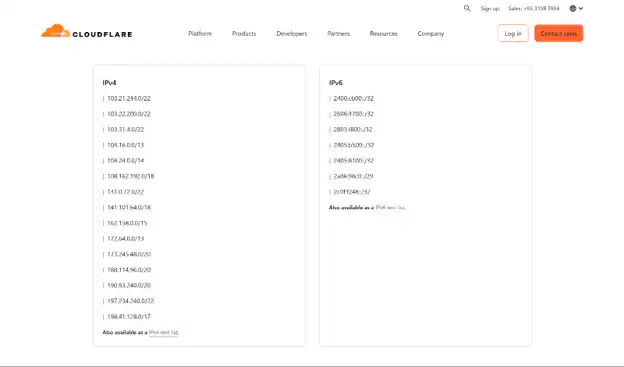
Add these IP ranges to your firewall allowlist for ports 80 and 443.
Cloudflare’s current IP ranges can be found h ere .
You’ll need to add both IPv4 and IPv6 ranges. Cloudflare’s IP ranges don’t change frequently, but when they do, the new IPs are added to the public list before being put into production. Consider using Cloudflare’s API to automatically update your firewall rules, or check the list quarterly to ensure you’re not blocking legitimate traffic.
Restore Real Visitor IP Addresses
After Cloudflare is active, your server logs will show all traffic coming from Cloudflare IPs instead of the actual visitor IPs. To restore real visitor IPs:
- Apache: Install and enable mod_remoteip or mod_cloudflare
- Nginx: Use the real_ip module with set_real_ip_from directives
- Application level: Read the CF-Connecting-IP header
This ensures your analytics, security tools, and rate limiting work correctly.
Step 5: Configure SSL/TLS Encryption
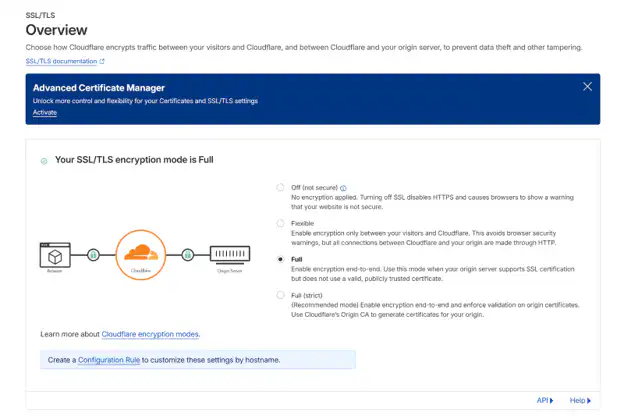
Go to SSL/TLS in your Cloudflare dashboard. The encryption mode controls how Cloudflare connects to your origin server.
Encryption Modes
- Flexible: Encrypts visitor-to-Cloudflare traffic only. Cloudflare connects to your server via HTTP regardless of the visitor’s protocol. Use this only if your server lacks SSL (then upgrade your server and switch to Full or Full Strict).
- Full: Encrypts both connections but doesn’t verify your server’s certificate. Cloudflare will connect via HTTPS if the visitor uses HTTPS, but accepts any certificate (even self-signed or expired). Better than Flexible but vulnerable to man-in-the-middle attacks.
- Full (Strict): Encrypts all traffic and verifies your server has a valid SSL certificate. This is the recommended mode for production sites. Choose Full (Strict) if your server has a valid SSL certificate from Let’s Encrypt or another certificate authority. This provides end-to-end encryption with certificate validation.
HTTPS Settings
Enable these settings under SSL/TLS → Edge Certificates:
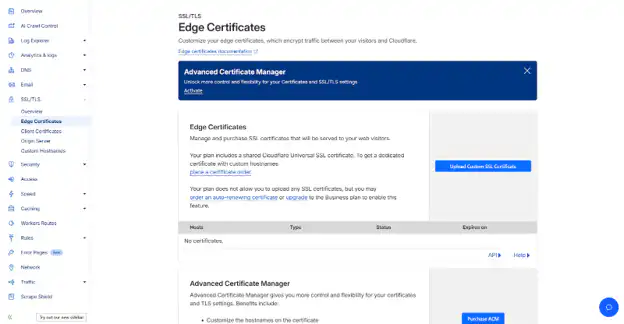
Automatic HTTPS Rewrites: Converts HTTP links to HTTPS automatically, preventing mixed content warnings.
Always Use HTTPS: Redirects all HTTP requests to HTTPS. Visitors typing http://yourdomain.com automatically get https://yourdomain.com.
HTTP Strict Transport Security (HSTS): Instructs browsers to only use HTTPS for your domain. Enable this after confirming SSL works correctly. Set max-age to 6 months (15768000 seconds), enable “Include subdomains” and “Preload.”
Minimum TLS Version: Set to TLS 1.2 or higher. TLS 1.0 and 1.1 have known security vulnerabilities.
Verify SSL Setup
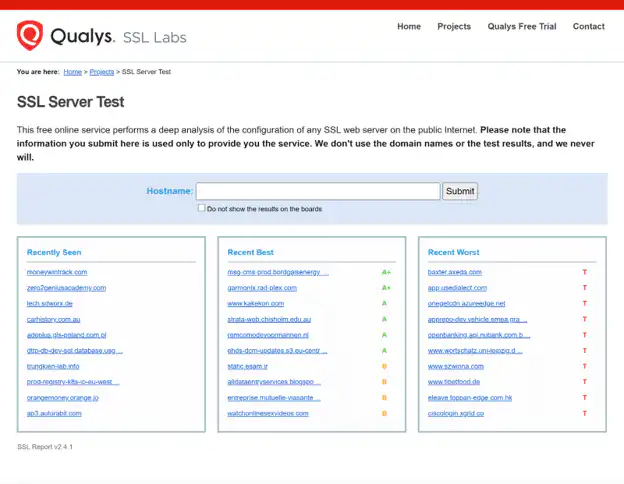
Visit SSL Labs and enter your domain. A properly configured site should achieve an A or A+ rating.
Step 6: Enable and Optimize CDN Caching
Cloudflare’s CDN activates automatically when you enable the orange cloud on DNS records. No additional setup required for basic caching.
The CDN stores copies of your static content (images, CSS, JavaScript, fonts) at edge locations worldwide. When someone visits your site, Cloudflare serves cached content from the nearest data center instead of your server.
This reduces latency for international visitors. Someone in Australia gets content from an Australian edge server, not your server location in Europe or North America.
Cache Rules and TTL
Go to Caching → Configuration. The default cache TTL (Time To Live) respects your server’s cache headers. For most sites, this works well out of the box.
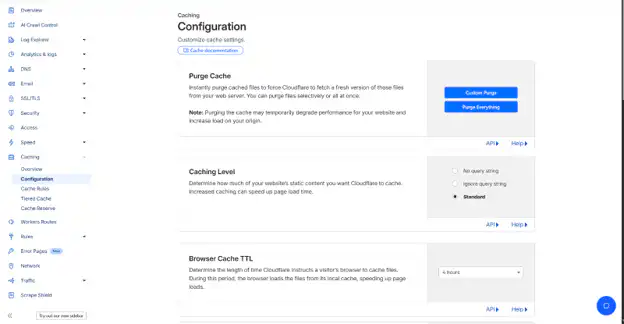
Create custom cache rules under Caching > Cache Rules for specific content types:
- Images: Cache for 1 month (2592000 seconds)
- CSS/JavaScript: Cache for 1 week (604800 seconds)
- HTML pages: Cache for 1 hour (3600 seconds) or respect server headers
- API responses: Bypass cache entirely
Note: These are general recommendations. Adjust based on your update frequency:
- Static sites that rarely change: Cache HTML for 1 day or more
- E-commerce or frequently updated sites: Cache HTML for 5–15 minutes
- Sites with user-specific or dynamic content: Don’t cache HTML pages at all
Origin Server Optimization
Cloudflare accelerates delivery but can’t fix slow server-side processing. Optimize your origin server:
- Enable server-side caching (Redis, Memcached) for database queries
- Compress files at the server level with gzip or brotli
- Minimize database queries and optimize slow queries
- Keep server software updated (PHP, MySQL, web server)
Your origin server’s performance directly impacts how effectively Cloudflare can cache and serve your content. If you’re on shared hosting or aging infrastructure, upgrading to a modern VPS like Virtarix with NVMe-only storage can dramatically improve your cache hit ratio and reduce Time to First Byte (TTFB).
Step 7: Common Issues and Troubleshooting
DNS Not Propagating
If your site isn’t accessible after 24 hours, verify nameservers at your registrar. Cloudflare’s dashboard shows “Active” status only after nameservers fully propagate.
Additionally, check your nameserver configuration at the registrar, remove any old nameservers completely, and confirm that the new ones have been saved. Some registrars require explicit confirmation. Use DNS lookup tools to verify propagation globally. Nameservers should match the exact values Cloudflare provided. Even a small typo can cause setup failures.
SSL/TLS Errors
“SSL handshake failed” or “too many redirects” errors indicate SSL misconfiguration. Check that your encryption mode matches your server setup.
If your server has no SSL certificate, use Flexible mode temporarily. Install Let’s Encrypt on your server, then switch to Full (Strict) mode in Cloudflare.
Redirect loops happen when your server redirects HTTP to HTTPS, but Cloudflare connects via HTTP. Change encryption mode from Flexible to Full or Full (Strict).
Email Delivery Problems
Cloudflare proxying breaks email if MX records have orange clouds. Set all email-related records (MX, TXT for SPF/DKIM) to gray cloud.
Your MX records must point directly to your mail server with correct priority values. If you use Google Workspace, Microsoft 365, or another email service, verify that all their required DNS records appear exactly as documented.
Test email delivery after setup by sending test messages and checking delivery logs. Most email issues resolve by ensuring all required DNS records are present and unproxied.
Site Loading Slowly
Slow performance after Cloudflare setup suggests caching issues. Check your cache hit ratio in Analytics. Low ratios mean your content isn’t caching effectively.
Review your cache rules and ensure static content caches properly. Verify that your server sends appropriate cache-control headers.
If you’ve bypassed cache for too many resources, Cloudflare won’t be able to accelerate them. Enable caching for images, CSS, JavaScript, and other static assets to improve performance.
Origin Server Errors (Error 520, 521, 522)
Error 520 means Cloudflare connected to your server but received an invalid response. Check your server logs for application errors.
Error 521 means your server refused the connection. Verify your server is running and your firewall allows Cloudflare IP ranges.
Error 522 means a connection timeout. Your server took too long to respond or is unreachable. Check your server status, restart your web server, or contact Virtarix support.
Conclusion
Your website is now protected by the same infrastructure that powers millions of sites around the world. Your content is delivered from the nearest data center instead of traveling across continents, and attacks are blocked at the edge before they can waste your bandwidth. Every connection is automatically encrypted with SSL. And the best part? You set it all up in just 15 minutes without touching a single line of code on your server.
Keep an eye on your analytics over the next couple of days. You’ll start to see your cache hit ratio go up, security threats get filtered out, and load times drop. That’s not just a technical upgrade – it’s fewer visitors bouncing, more conversions staying on track, and hosting costs finally under control. The free plan is powerful enough for serious traffic, and if you ever need more advanced features, upgrading is just one click away.
This is what modern hosting looks like: globally distributed, automatically secured, and fine-tuned for performance without the hassle. Your site runs faster, your infrastructure stays protected, and you end up paying less to deliver more. That’s the Cloudflare advantage.