
Remote server management often requires more than command-line access. When you need to view your server’s graphical interface or troubleshoot display issues, VNC becomes essential. In this guide, we’ll show you how to connect to your server using VNC through two methods: browser-based noVNC for quick access, and TigerVNC desktop client for advanced users.
What is VNC and How Does It Work?
VNC (Virtual Network Computing) transmits your server’s screen, keyboard, and mouse controls over a network. Unlike SSH, VNC provides full graphical access, showing you windows, icons, and applications exactly as they appear on the physical machine.
The technology uses the Remote Framebuffer protocol to send screen updates from your server to your computer. This open-source protocol works across Windows, Linux, and macOS, making VNC valuable in mixed-environment data centers.
However, VNC has security limitations. Most implementations lack default encryption and use simple password authentication. This makes VNC less secure than SSH or Windows Remote Desktop. Use VNC primarily for emergency access when standard connection methods fail.
When to Use VNC
Use VNC when SSH becomes unresponsive but your server is still running, or when you need to troubleshoot graphical applications that can’t be diagnosed through command-line access alone. For daily administration, SSH provides better security with encrypted sessions and key-based authentication.
VNC requires your operating system to be at least partially running. For hardware-level access to BIOS or boot menu, you’ll need IPMI, iLO, or iDRAC from your hosting provider. These management interfaces work independently of your operating system.
Understanding VNC Access Methods
Modern hosting providers in 2025 offer two distinct VNC access options, each suited for different use cases.
Browser-based noVNC runs entirely in your web browser using HTML5 technology. When you click the console button in your control panel, noVNC establishes a WebSocket connection and displays your server screen directly in the browser tab. This requires no software installation and works across all devices including tablets and smartphones, making it ideal for emergency access from any location.
Desktop clients like TigerVNC install on your local computer and connect directly to your server’s VNC port. While requiring initial setup, desktop clients typically provide better performance, lower latency, and advanced features like SSH tunneling integration. TigerVNC remains popular in 2025 due to its active development and cross-platform support.
Most providers, including Virtarix, offer noVNC as their primary solution. We recommend starting with noVNC for most users, then exploring desktop clients only if you need specific advanced features or encounter performance issues with the browser-based approach.
Quick Comparison: noVNC vs TigerVNC
| Feature | noVNC (Browser) | TigerVNC (Desktop) |
|---|---|---|
| Installation | None required | Download & install |
| Access | Any device with browser | Specific computer only |
| Performance | Good (slight lag) | Excellent (low latency) |
| Security | HTTPS encrypted | Requires SSH tunnel |
| Best For | Quick access, emergencies | Regular use, power users |
| Mobile Support | Full support | Limited/None |
| Setup Time | Instant | 5-10 minutes |
Method 1: Using noVNC in Your Browser (Recommended)
noVNC provides the easiest VNC access through your web browser. It requires no installation and works on any device with a modern browser.
Accessing the noVNC Console
Log into your hosting control panel and look for buttons labeled Console, noVNC, VNC Console, or Browser Console.
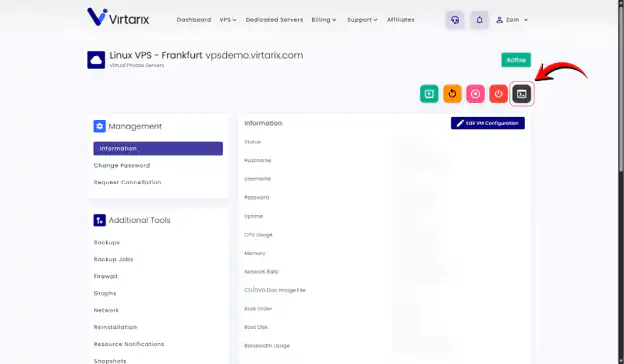
Click the console button. Your browser opens a new window and establishes a connection to your server. This typically takes 2-5 seconds.
Logging Into Your Server
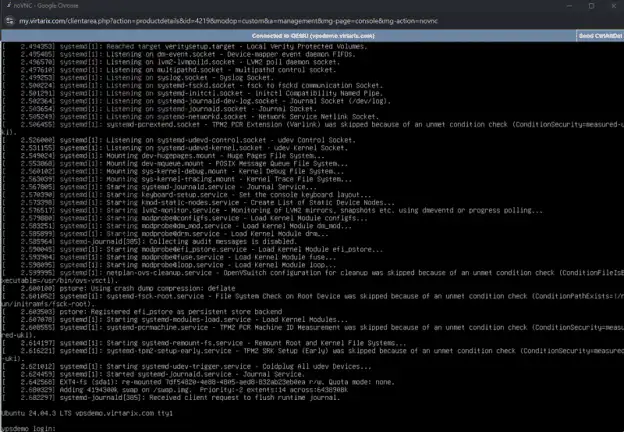
The noVNC window displays your server exactly as if you were sitting in front of it. Your mouse clicks and keyboard input now control the remote server rather than your local computer.
For Linux servers, type your username (typically root) and press Enter. Then type your password. After authentication, you’ll see your command prompt: root@yourserver:~#
For Windows servers, the system displays a locked screen. You cannot use your physical keyboard’s Ctrl+Alt+Delete because these keys trigger actions on your local computer. Click the Send CtrlAltDel button in the noVNC toolbar (usually on the left side) to unlock Windows, then enter your credentials.
noVNC offers zero installation requirements, allowing server access from any computer without administrative rights. The browser-based approach works seamlessly across different operating systems. However, noVNC introduces slightly higher latency compared to desktop clients, particularly noticeable when moving windows. For users who need regular VNC access, a desktop client provides better performance.
Closing Your noVNC Session
Always log out before closing the browser window. For Linux, type logout and press Enter. For Windows, click Start > Log out. Then close the browser tab.
Method 2: Using TigerVNC Desktop Client
TigerVNC offers a more powerful alternative for users who need regular VNC access or advanced features. This standalone application connects directly to your server’s VNC port, bypassing the web browser layer for improved responsiveness and lower latency.
Consider using TigerVNC if your provider doesn’t offer noVNC integration, you need SSH tunneling for enhanced security, or browser-based VNC feels too laggy for comfortable use. Desktop clients also provide more customization options for display quality, compression settings, and keyboard mapping.
Verifying VNC Client Support
Not all hosting providers allow direct VNC connections from external clients. Many restrict VNC access to their integrated noVNC interface for security reasons. Before installing TigerVNC, contact your provider’s support team to confirm they support external VNC clients.
You’ll need three pieces of information: your VNC IP address (typically your server’s primary IP), your VNC port number (standard is 5900 but providers may use different ports), and your VNC password (separate from your root password). Some providers include this information in your server dashboard, while others require a support ticket to retrieve these details.
Installing TigerVNC
Download TigerVNC. Choose the appropriate installer for your operating system. Windows users should download the .exe installer, macOS users need the .dmg file, and Linux users can install through their package manager. Run the installer and follow the on-screen prompts.
Alternative VNC clients exist if TigerVNC doesn’t meet your needs. RealVNC Viewer offers a more polished interface with guided setup wizards. UltraVNC provides Windows-specific features like file transfer, though it lacks cross-platform compatibility. We recommend TigerVNC for its active development and strong community support.
Connecting Through TigerVNC
Launch TigerVNC Viewer from your applications menu or desktop shortcut. The program opens directly to a connection dialog where you enter your server details.
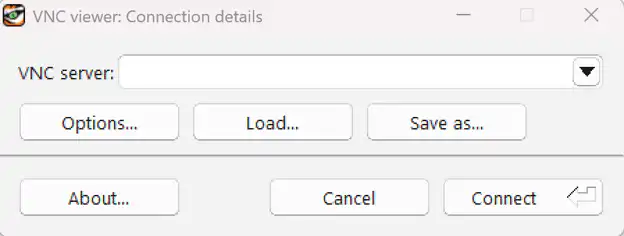
Enter your connection details in the format <VNC_IP>:<VNC_PORT>, for example 192.168.1.100:5900. If your server uses the standard port 5900, you can omit the port number and enter only the IP address. TigerVNC assumes port 5900 by default.
Click Connect to initiate the connection. TigerVNC establishes a direct network connection to your server’s VNC port and requests authentication. A password prompt appears within seconds if your connection details are correct.
Enter your VNC password carefully, paying attention to case sensitivity. Before entering any password, test your keyboard layout by typing a few characters. Some keyboard layouts swap the Y and Z keys (QWERTY versus QWERTZ), which can cause authentication failures if you don’t notice the mismatch.
Server Login
After VNC authenticates your connection, you’ll see your server’s display but still need to log into the operating system itself. VNC provides the connection layer, while your OS handles user authentication separately.
For Linux, type your username (typically root), press Enter, then type your password. You’ll see: root@yourserver:~#
If you don’t know your password, reset it in your control panel under Manage > Password Reset. This generates a new password and emails it to your account address.
For Windows, click the Send Ctrl+Alt+Del button in TigerVNC’s toolbar to unlock Windows. Your physical keyboard’s Ctrl+Alt+Delete won’t work because pressing these keys triggers actions on your local computer instead.
Enter your Windows credentials and press Enter or click the arrow button.
Recovering Servers That Won’t Boot
VNC can assist with certain boot failures when your operating system is at least partially running. If your server is completely dead or stuck before the OS loads, VNC won’t help.
For hardware-level access to BIOS settings, boot menu selection, or viewing pre-OS startup messages, you need IPMI, iLO, or iDRAC. These management interfaces operate independently of your operating system, providing access even when your server won’t boot. Contact your hosting provider to check availability, as they typically come with dedicated servers rather than standard VPS plans.
VNC becomes useful when your provider mounts a rescue system. Rescue systems are minimal operating environments that boot independently of your main installation, allowing you to access your server’s files and repair configuration issues.
Using VNC for System Recovery
When your server won’t boot, contact your provider to mount a rescue ISO or boot into rescue mode. Providers typically offer this service through their control panel or by opening a support ticket. Rescue ISOs usually run lightweight Linux distributions designed for system recovery tasks.
Once the rescue system is running, connect via VNC. Your regular files aren’t automatically accessible – you must mount them first.
List available storage devices and mount your partition:
					# List available disks
lsblk

# Mount your root partition
mount /dev/sda1 /mnt
After mounting, your server’s filesystem becomes accessible under /mnt. You can now navigate directories, edit configuration files, or check log files to diagnose boot problems.
Checking Filesystem Integrity
Filesystem corruption can prevent normal booting. The fsck utility scans your disk for errors and attempts automatic repairs. Never run filesystem checks on mounted filesystems—this will corrupt your data.
Follow this exact sequence:
					# Unmount first
umount /dev/sda1

# Run filesystem check
fsck -y /dev/sda1

# Remount after completion
mount /dev/sda1 /mnt
The fsck process may take several minutes on large disks. Let it complete without interruption. After fsck finishes, remount your filesystem and verify your important files remain intact before attempting a normal reboot.
VNC Troubleshooting
Black Screen
If you see a black screen after login, click the VNC window and press Enter to wake the display.
Wrong Keyboard Characters
If characters don’t match your keystrokes, your keyboard layout is mismatched. For noVNC, check the settings menu. For TigerVNC, go to Options > Input > Keyboard layout.
Connection Issues
If TigerVNC shows Connection refused, verify VNC is enabled in your control panel, confirm the port number (usually 5900), check your firewall, and confirm your provider allows external VNC clients.
For noVNC issues, contact your provider’s support as their VNC server might be down.
Performance Issues
If noVNC feels slow, check your internet speed, close other browser tabs, and try Chrome or Firefox. If problems persist, consider using TigerVNC instead.
For more troubleshooting, see our common VPS hosting issues guide.
Finishing Your VNC Session
Always log out after finishing your work. VNC sessions don’t timeout automatically like SSH connections. Since VNC is independent of your operating system’s session management, your session stays active indefinitely until you explicitly log out. This creates a security risk because anyone who gains access to your control panel can jump into your active session.
For Linux, type logout at the command prompt and press Enter. If you’re using a graphical desktop environment, click the logout button in your system menu. For Windows, click Start > Log out.
Then close the noVNC browser tab or TigerVNC viewer window to fully terminate the connection.
Security Concerns over Using VNC
VNC is convenient, but it’s not designed for maximum security. It was developed in the 1990s when security wasn’t as critical as today. VNC access is less secure than SSH or Windows Remote Desktop Protocol (RDP). Under normal circumstances, you should always connect using more secure methods. We recommend using VNC only when your server is not accessible via SSH or Remote Desktop.
noVNC Security
noVNC runs over HTTPS through your control panel, providing basic encryption. Your access is tied to your control panel login. Many providers implement session timeouts for security. However, noVNC is still less secure than SSH for regular administration.
TigerVNC Security: Tunnel Through SSH
For better TigerVNC security, always tunnel through SSH:
ssh -L 5900:localhost:5900 username@server-ip
Keep this terminal open, then connect TigerVNC to localhost:5900. All VNC traffic now travels through encrypted SSH.
Best Practices
Change your VNC password regularly and use strong passwords with at least 16 characters, mixing uppercase, lowercase, numbers, and symbols. Disable VNC in your control panel when not using it. Most providers let you toggle VNC on and off with a single button click.
Configure your server’s firewall to allow VNC connections only from trusted IP addresses. This prevents unauthorized access attempts from the internet. Use noVNC for quick emergency tasks, but if you need frequent VNC access, set up TigerVNC with SSH tunneling properly for better performance and security.
Conclusion
VNC provides essential emergency access when standard methods fail. For most users, use noVNC through your control panel—it requires no installation and works from any device. For advanced users needing regular access, TigerVNC offers better performance with SSH tunneling.
Rely on SSH for daily administration. Use VNC as backup, not your primary tool. Always log out properly, use strong passwords, and disable VNC when not needed.