Deutsch

This document outlines the process of installing WordPress in a web development setting. The steps include setting up necessary software, configuring databases, and completing the installation of WordPress. Ensure that PHP, NGINX and MariaDB are installed before proceeding.
Step 1: prepare your VPS environment
Ensure that PHP, NGINX and MariaDB are installed in your development environment.
Create a separate user from the root user for usage and run this command to switch users:
su - YOUR_USERUse the following command to make WP-CLI executable:
chmod +x wp-cli.phar Download the WP-CLI Phar with:
Safety check: This legacy command uses plain HTTP. Prefer the official HTTPS WP-CLI release URL, verify the published checksum before execution, and keep the downloaded Phar outside the system path until verification succeeds.
curl -O http://githubusercontent.com/wp-cli/gh-pages/phar/wp-cli.phar

Step 2: set up WP-CLI and configure access
Move the WP-CLI file to an appropriate directory with
sudo mv wp-cli.phar /usr/local/bin/wp You can then use it as the:
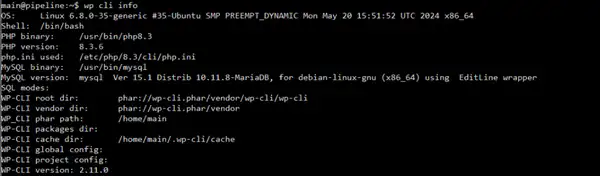
wp Check the WP-CLI version by running:
wp cli info
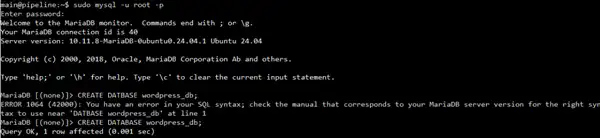
Log in to MariaDB using
sudo mysql -u root -p to proceed with database creation. Enter the root password when prompted.
Step 3: set up and organize your WordPress database
Execute the SQL command
CREATE DATABASE YOUR_DATABASE; to create the database. These commands are case sensitive, so be sure to type them as-is.

Grant necessary privileges to the WordPress user with
GRANT ALL PRIVILEGES on YOUR_DATABASE.* TO 'NEW_USER'@'localhost' IDENTIFIED BY 'STRONG_PASSWORD'

Step 4: create and configure the WordPress database
After granting privileges, exit MariaDB by typing EXIT;. Navigate to /var/www/html using:
cd /var/www/htmlStep 5: prepare the WordPress installation directory
Install and download WP-Core using
wp core download --locale-en_[your-language]Please note when downloading WP-Core make sure to adjust the language when installing e.g.
wp core download --locale-en_GB (English) or wp core download --locale-en_NL (Dutch)If permission errors occur, identify your user by typing whoami and adjust permissions for /var/www/html using:
Safety check: Confirm the target and keep a recent backup or snapshot. Preview the affected resources where possible, and document a tested recovery or rollback path before running this command.
sudo chown -R YOUR_USER /var/www/htmlfor the necessary access.

Step 6: download and install WordPress core files
Once downloaded, execute
wp config create --dbname=YOUR_WP_DATABASE --dbuser=YOUR_USER --dbpass=STRONG_PASSWORD --dbhost=localhost to set up the wp-config.php configuration file.

Step 7: run the WordPress configuration command
Run the following command:
wp core install --url="YOUR_DOMAIN_NAME" --title="YOUR_SITE_TITLE" --admin_user="YOUR_USER" --admin_password="ANOTHER_STRONG_PASSWORD" --admin_email="YOUR_EMAIL"

Step 8: configure PHP-FPM for WordPress
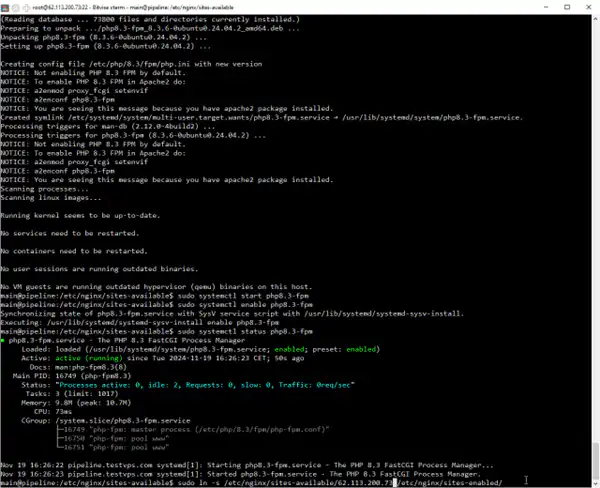
Verify the PHP-FPM version you have installed, and update the server configuration file to match this version. Here, we're using PHP 8.3.
Check the status of PHP FastCGI Process Manager with
sudo systemctl status php8.3-fpm.If it is not installed use
sudo apt install php8.3-fpm to install it.
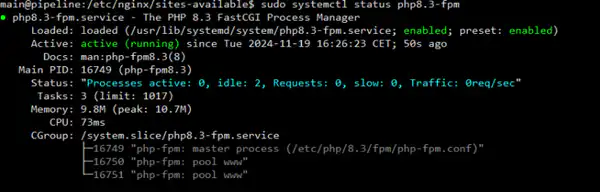
If the PHP-FPM service is not running, start it with
sudo systemctl start php8.3-fpmEnable it to start on boot with
sudo systemctl enable php8.3-fpmStep 9: configure Nginx for WordPress
Configure NGINX by navigating to /etc/nginx/sites-available with:
cd /etc/nginx/sites-available Create a new file for your domain using the
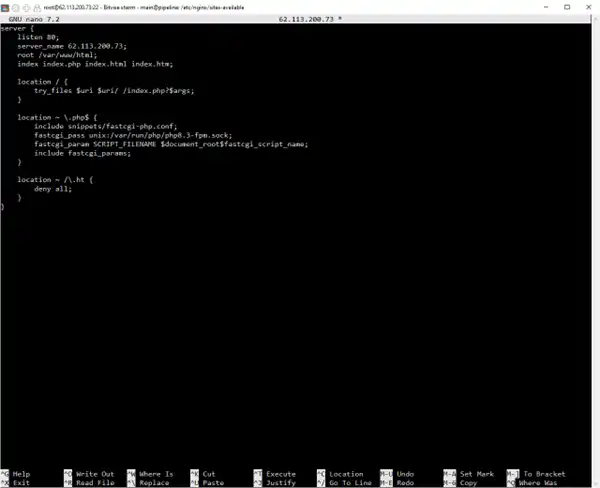
sudo nano YOUR_DOMAIN_NAME command and add the server configuration.
Enter your root domain and fully qualified domain name in the server_name section as:
server_name YOUR_DOMAIN_NAME; Save the file after editing.
Step 10: configure and activate Nginx for WordPress
Update your system by typing:
sudo apt updateStep 11: add server names to your Nginx configuration
Create a symbolic link from sites-available to sites-enabled running this command:
sudo ln -s /etc/nginx/sites-available/YOUR_DOMAIN_NAME /etc/nginx/sites-enabled/to ensure the configuration loads correctly.
Step 12: test and apply Nginx changes with PHP-FPM
Test the NGINX configuration with
sudo nginx -t to ensure it works properly.

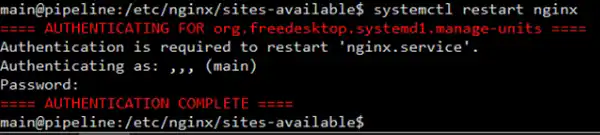
Apply the new changes by restarting NGINX with systemctl restart nginx. You may be prompted to input a password to restart nginx.service.
Step 13: set up DNS records for your VPS domain
Access your domain provider's settings to change DNS records, add an A record that points to your VPS.
Frequently asked questions
What software is required before installing WordPress on a VPS?
Ensure PHP, NGINX, MariaDB, a DBMS, and a web server are installed before starting.
How do I create a database for WordPress?
Log in to MariaDB, execute SQL commands to create a database, and grant user privileges with a password.
What should I do if I encounter permission errors during the installation?
Use the whoami command to identify your user and adjust permissions with chown for proper access.
How do I test and apply NGINX server configuration changes?
Use the command sudo nginx -t to test the NGINX configuration. If there are no errors, apply the changes by restarting NGINX with this command:
sudo systemctl restart nginxHow can I connect my domain to the WordPress VPS?
Update DNS settings with your domain provider by adding an A record pointing to your VPS IP address.
Ready to run a WordPress development VPS?
Compare VPS sizes for WordPress development, staging, databases, root access, NVMe storage, IPv4 + IPv6, snapshots, and backups.
VPS S
For small WordPress sites
- ✓ 3 cores
- ✓ 6 GB
- ✓ 50 GB NVMe
- ✓ Unlimited
VPS M
For growing WooCommerce or blogs
- ✓ 6 cores
- ✓ 16 GB
- ✓ 100 GB NVMe
- ✓ Unlimited