 Deutsch

Use the Firewall section of the Virtarix control panel to define which traffic can reach or leave your VPS. Each rule specifies a direction, action, and matching conditions such as protocol, address, and port. Review rule order and test the required connections after making a change.
Why use the firewall?
A firewall restricts network connections to the services and clients you intend to allow. It works alongside application authentication, operating-system updates, and access controls. Before changing rules, identify the services the server must provide and confirm a recovery route if remote access stops working.
Configuring the firewall
Accessing the firewall settings
- Log in to your Virtarix control panel.
- Select the VPS you intend to change and confirm its identity.
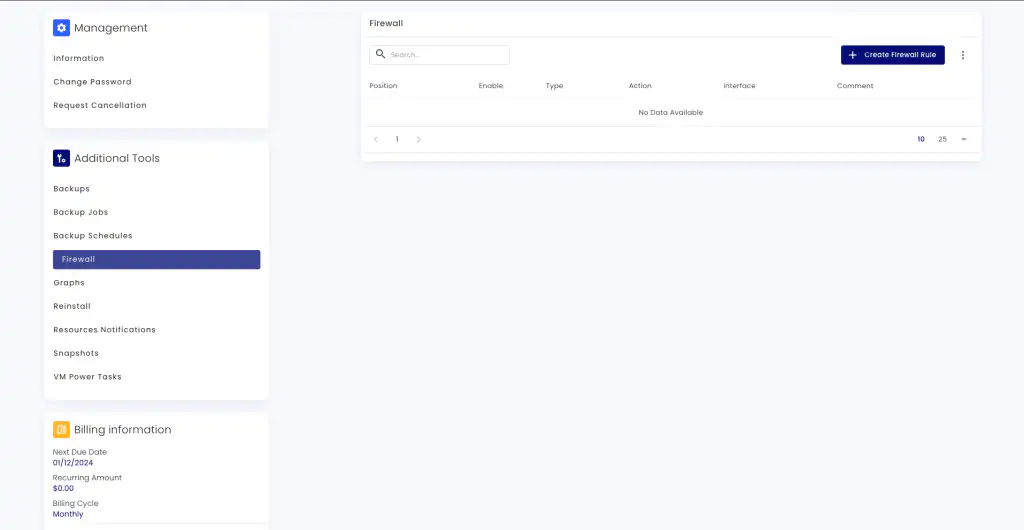
- Open Firewall in the left-hand menu.
Adding firewall rules
- Select Create Firewall Rule, as shown in the screenshot.
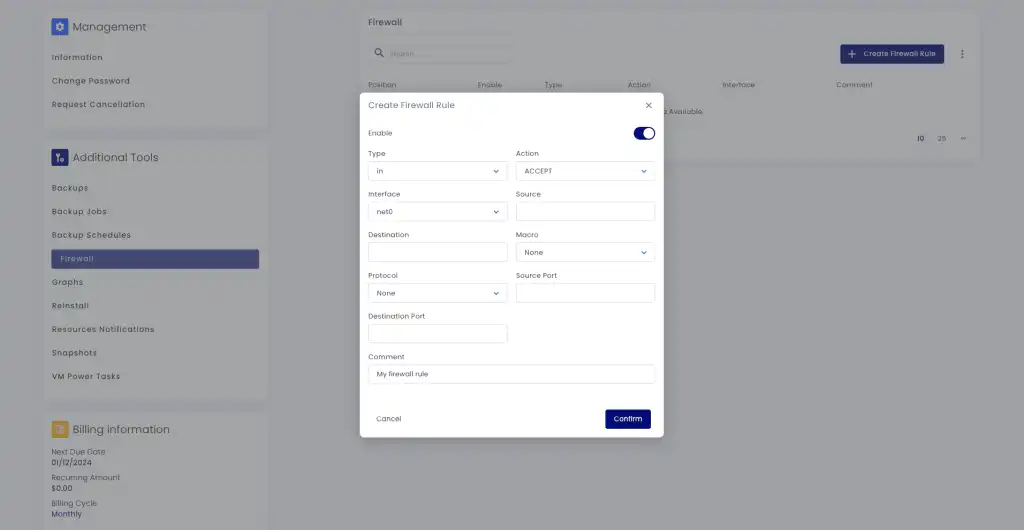
- Choose the traffic direction and an action: Accept, Drop, or Reject.
- Set the protocol, source and destination addresses, and any required port conditions.
- Add a comment explaining the rule's purpose, review the Enable setting, and select Confirm.
- Check the rule's position relative to existing rules. Put specific exceptions before a broader rule that would otherwise match the same traffic.
Default settings
Check the firewall's current state and existing rules before adding your own. Virtarix blocks email ports, including port 25; customer firewall rules do not override provider restrictions.
Check each server and container network
Repeat the review for each server you administer. If you run containers inside a VPS, also check their published ports and networking rules, along with the firewall inside the guest operating system. A rule in one layer does not describe the entire traffic path.
Firewall rule options
The form separates addresses, ports, and actions. Set only the conditions the intended connection requires:
- Type (In, Out): Specify the direction of the traffic. “In” for incoming traffic and “Out” for outgoing traffic.
- Action (Accept, Drop, Reject): Define what action to take when the rule matches. “Accept” allows the traffic, “Drop” silently discards it, and “Reject” discards the traffic and sends an error response.
- Interface: Specify the network interface to which the rule applies. This can help in managing traffic on different network segments.
- Source: Define the source IP address from which the traffic originates.
- Destination: Specify the destination IP address to which the traffic is directed.
- Macro: Use predefined macros for common services and protocols to simplify rule creation.
- Protocol: Select the protocol (TCP, UDP, etc.) that the rule will apply to.
- Source Port: Match the sending side's port when required. Clients commonly use a temporary source port, so do not enter the server's listening port here by mistake.
- Destination Port: Specify the destination port number or range for the traffic.
Best practices
- Plan a restrictive policy: List required inbound and outbound connections before adding a broad deny rule. Preserve management access and service dependencies, then review the order in which rules match.
- Test one change at a time: Keep the existing management session open and test a new connection. Confirm that intended traffic succeeds and unwanted traffic is denied, including IPv6 where used.
- Review old rules: Remove obsolete exceptions through a controlled change, with the previous rule details available for recovery.
- Monitor results: Review connection failures and relevant logs after changes. Investigate unexpected denials or newly reachable services.
Conclusion
After saving a rule, verify its direction, addresses, protocol, ports, and position. Test the connections the server needs and record the result. Revisit the rules whenever services, client addresses, or access requirements change.



